
TP-Link ArcherUpdated 2 months ago
TP-Link Archer AX55 Fibre Setup Guide
Step 1 – Connect Your Router to the ONT
Connect the router’s WAN/Internet port to the correct LAN port on your Optical Network Terminal (ONT), usually LAN1 or GE1. Check your Mythical welcome instructions to confirm which port to use.
Power on the router and connect your computer or mobile device using Wi-Fi or a LAN cable.
Step 2 – Access the Router Admin Panel
Open a browser and visit either:
Newer Archer routers normally ask you to create an administrator password. If a username and password screen appears, try the credentials printed on the router label or admin for both fields.
If you cannot remember a previously configured password, see Step 10.
Step 3 – Configure the Internet Connection
Go to Advanced > Network > Internet and configure:
- Connection Type: Dynamic IP
- DNS Address: Get Dynamically from ISP
- MTU Size: 1500
- Router MAC Address: Use Default MAC Address
- NAT: Enabled
- Port Negotiation: Auto or 1000 Mbps Full Duplex
Click Save.
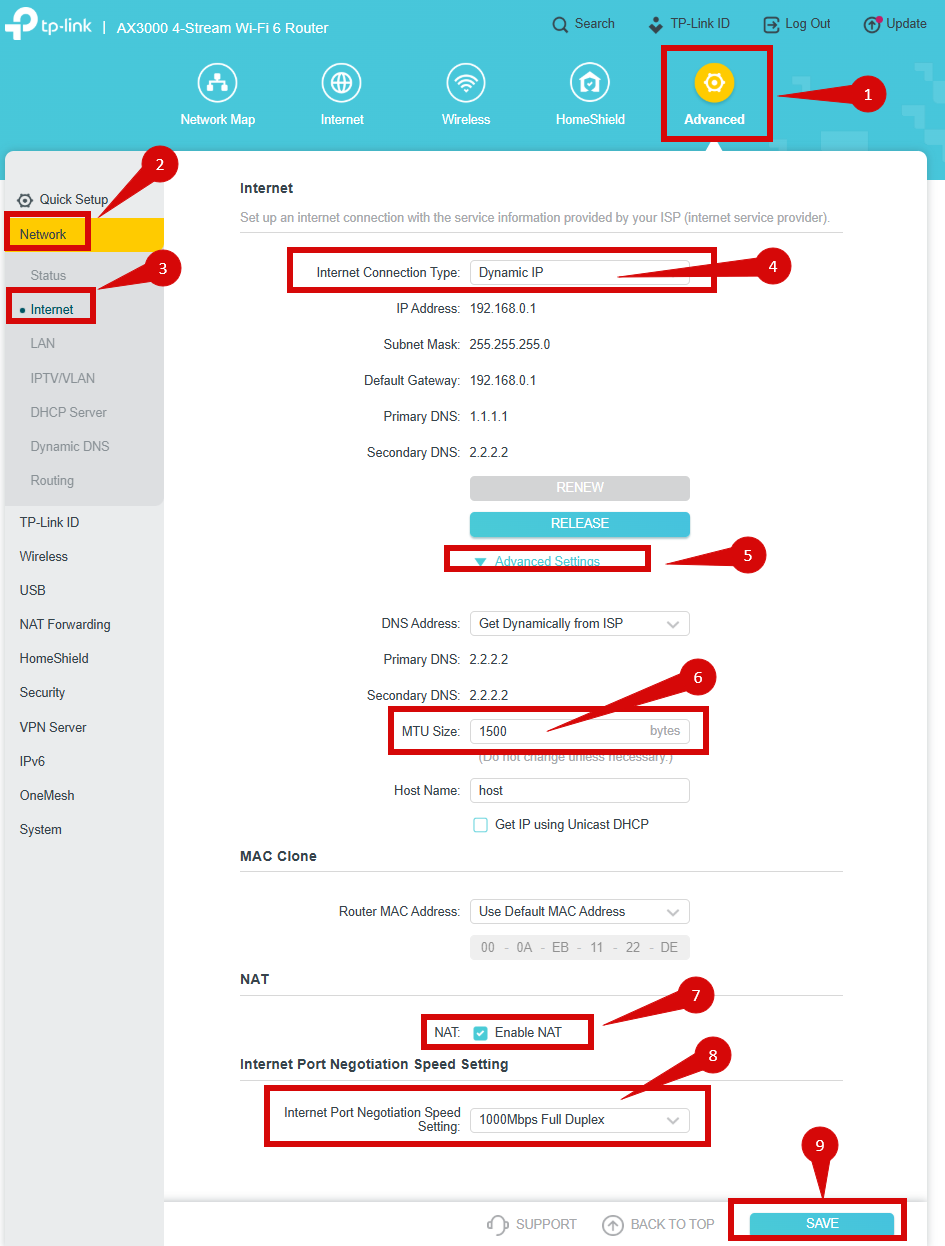
Image markers: 1 Advanced; 2 Network; 3 Internet; 4 Dynamic IP; 5 Advanced Settings; 6 MTU 1500; 7 Enable NAT; 8 Port Negotiation; 9 Save.
Step 4 – Configure VLAN Tagging
Go to Advanced > Network > IPTV/VLAN and configure:
- IPTV/VLAN: Enabled
- Mode: NZ UFB, if available; otherwise Custom
- 802.1Q Tag for Internet: Enabled
- Internet VLAN ID: 10
- Internet VLAN Priority: 0
Leave the IPTV, VoIP, multicast and IGMP settings at their defaults unless Mythical instructs otherwise. If you do not use IPTV, assign every LAN port to Internet.
Click Save.
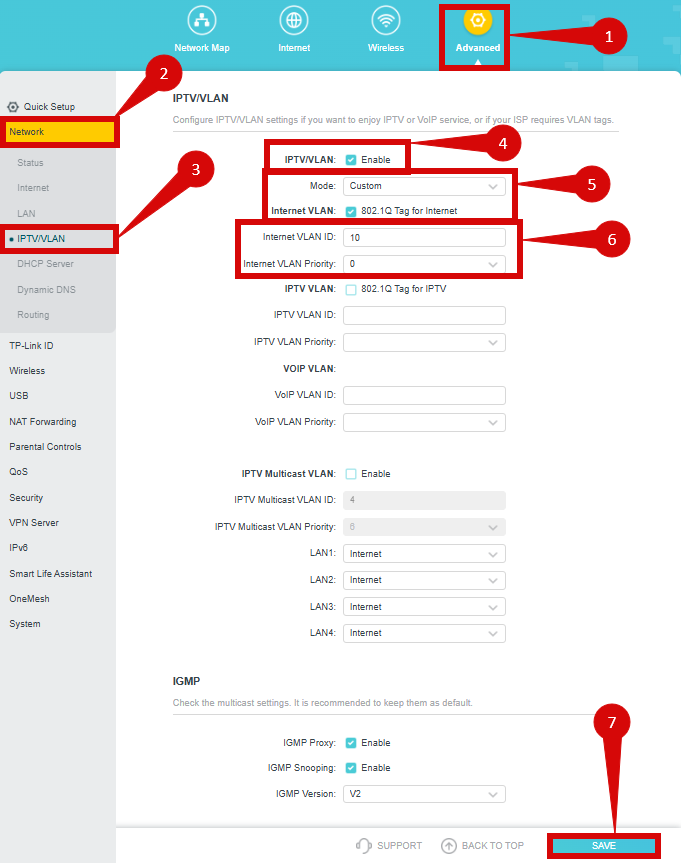
Image markers: 1 Advanced; 2 Network; 3 IPTV/VLAN; 4 Enable IPTV/VLAN; 5 Custom mode; 6 VLAN ID 10 and priority 0; 7 Save.
Step 5 – Disable SIP ALG
Go to Advanced > Security > ALG, turn SIP ALG off and click Save. Leave the other ALG settings unchanged.
Step 6 – Configure IPv6 (Optional)
Go to Advanced > IPv6, enable IPv6 and configure:
- Connection Type: Dynamic IP (SLAAC/DHCPv6)
- Get IPv6 Address: DHCPv6, or Auto if DHCPv6 is unavailable
- Prefix Delegation: Enabled
- Delegation Size/Prefix Length: 56, if available
- DNS Address: Get Dynamically from ISP
- DHCPv6: Enabled
- LAN Assigned Type: SLAAC + Stateless DHCP, if available
If the router does not show a delegation-size field, enable Prefix Delegation and leave the prefix automatic. Do not manually enter /56 in the LAN address-prefix field.
Click Save.
Step 7 – Apply the Configuration
Click Save or Apply. The router may restart automatically; allow several minutes for it to finish.
Step 8 – Verify the Internet Connection
The WAN/Internet LED should be solid green. Open a website on a connected device to confirm that the connection is working.
You can also open Advanced > Status and check for an IPv4 address, default gateway and DNS servers. If IPv6 is enabled, check for an IPv6 address or delegated prefix.
Step 9 – Troubleshooting
If the internet connection is not working:
- Confirm that the router is connected to the ONT port specified in your Mythical welcome instructions.
- Check that the connection type is Dynamic IP.
- Confirm that VLAN ID is 10 and priority is 0.
- Confirm that 802.1Q Tag for Internet is enabled.
- Confirm that NAT is enabled and the default MAC address is selected.
- If you do not use IPTV, assign every LAN port to Internet.
- Unplug the ONT and router for at least 30 seconds.
- Power on the ONT first and wait for its lights to stabilise.
- Power on the router and wait several minutes before testing again.
If IPv4 works but IPv6 does not, recheck Prefix Delegation and DHCPv6. IPv6 is optional and should not prevent IPv4 from working.
Step 10 – Reset the Router (If Required)
A factory reset removes the existing internet, Wi-Fi and administrator settings.
- Locate the reset button on the back of the router.
- Press and hold it with a paperclip for approximately 10–15 seconds.
- Release it when the router’s lights begin flashing.
- Wait for the router to return to its factory settings.
- Repeat the setup from Step 2.